A CNC Router Can Be Useful At Home

You can use a cnc router table for cutting various types of materials. Depending on what kind of machine you buy you can cut, plastic, metal, or wood with your CNC router. You can use your machine for basic routing work or to make signage. Since your router also does engraves, it can be very versatile. So if you can only buy a single machine, you should be able to get many different uses from it.

Drill Bit Kit

In the past few years many people have considered purchasing a used cnc router or a new one for their home use. Some smaller shops have also bought them for a variety of purposes. You can save a lot if you go for a used machine instead of a new one.

Drill Bit Kit

You can also follow certain plans online that can teach you how to create your own. You can make one to suit your purposes from 15 x 15 up to 50 x 60 inches.

Using a cnc router can help you complete projects that you wouldn't be able to on your own. You can create patterns and lay down metal inlays onto wood. Your creations will be smoothly done and correctly done. It will help you accomplish tasks you couldn't do by hand alone.

If you want truly pro results when it comes to crafting furniture then a cnc router can help you out. Using special software will help you to program things exactly so you get the cuts you want. Use for engraving anything you want from a outdoor sign to the smallest cnc lettering. Once you know how to operate the machine and software, you can create virtually anything.

You can find a small machine that can be operated in your home with just a normal 120 voltage. This type of machine would be good for home use. These kind of machines have motors that range from 1-2 horsepower. These small models run about ,500 used or ,000 new. This makes buying a used machine a great option for your home. If you wanted to get a large machine this could cost ,000! This is more than most people want to spend on their home equipment. If you are buying one for a potentially profitable business, then this might be a consideration.

You can save about half if you buy a router used. You can get all the power from it, a save twice as much! When you are looking around for a router shop carefully. You should determine your exact needs and then find a machine that will handle them. If you get a used router you should remember that it may be a bit slower than a new one, but if you don't have large volume then it should be OK for you.

A CNC Router Can Be Useful At Home
Drill Bit Kit

Protein Workout Krups Toaster Oven

Tornado Science Fair Projects

Creating a tornado science fair project has been quite popular at science fairs. Of course, it isn't possible to create a life-sized tornado for obvious reasons! However, miniaturized versions may be created using simple models like the one about to be demonstrated. It is to be remembered that proportions matter a lot, while creating the models. Therefore, these exact proportions need to be followed. The following is possibly the simplest tornado science fair project that can be made with daily household materials. This experiment demonstrates the formation of the eye of the tornado - the central zone of calmness known as the vortex - within ordinary bottles.

Drill Bit Kit

The tornado science fair project requires simple ingredients:
- Two large bottles - the larger the better. Soft drink bottles made of plastic are recommended.
- Water colored using food coloring. The lighter the color is, better the demonstration will be. Glitter dust or confetti result in a dazzling display.
- A drill.
- Duct tape and silicon caulking.
- A steadily spinning surface, an old record player if possible.

Drill Bit Kit

The apparatus can be set up quite easily. The first step of tornado science fair project is to make half-inch wide holes at the center of the caps. These caps may then be joined together using the silicon caulking, keeping the holes connected. The bottles may be filled with the colored water now. The second step of the tornado science fair project is to attach each end of this double cap to each bottle. Finally, the two caps may be firmly fastened using the duct tape. The entire apparatus takes a shape and form similar to that of an hourglass.

Now, the entire apparatus of the tornado science fair project may be placed upside down, the bottle with the water being at the top, on the spinning surface. It will be observed that as the water slowly drains out to the lower bottle, a vortex is formed in the midst of the spinning water. This vortex is similar to the structure of the vortex formed inside a tornado.

Precautions to be taken during this tornado science fair project are few, but important. The joints must be made perfectly airtight, so that there is no leakage of water and air bubbles don't enter the bottles. Moreover, the spinning surface must have a steady motion. Otherwise, the entire rhythm of the tornado would be disrupted. The steps are few; however, are important in a tornado science fair project.

The project, as it stands, is a very simple, elegant, and elementary science fair project that judges see all of the time. What you must do in order to stand out is to make this project a little bit different than everyone else's science fair project. The fact is, with a project like this, you won't get a really stunning A+ grade simply because this project didn't involve too much individual thinking. However, by taking this model as a start and exploring some related concept or by looking at some specific aspect of the model, you can really earn a fantastic grade, and maybe even win the science fair with this simple tornado science fair project.

Tornado Science Fair Projects
Drill Bit Kit

Aluminum Air Blow Gun Cookies And Cream Protein Grande Lava Lamps

Makita T-01389 62-Piece Impact Drill-Driver Bit Set

Christmas Sales Makita T-01389 62-Piece Impact Drill-Driver Bit Set 201

Dec 22, 2011 23:37:27

Christmas Makita T-01389 62-Piece Impact Drill-Driver Bit Set Deals
Click for larger image and other views

Makita T-01389 62-Piece Impact Drill-Driver Bit Set

>> Click here to update Christmas prices for Makita T-01389 62-Piece Impact Drill-Driver Bit Set <<

Christmas Sales Makita T-01389 62-Piece Impact Drill-Driver Bit Set Feature

  • 135-degree split-point tip
  • 1/4-inch shank size
  • 62-piece set
  • Includes clam shell carrying case
  • Compatible with all drills


Christmas Sales Makita T-01389 62-Piece Impact Drill-Driver Bit Set Overview

Includes seven black oxide precision 135-degree split point 1/4-inch hex shank drill bits, (2) 1/16-inch, 3/32-inch, (2) 1/8-inch, 3/16-inch, 1/4-inch, (3) wood boring drill bits 1/2-inch, 5/8-inch, 3/4-inch, (9) 2-inch driver bit assortments: slotted, Phillips, Robertson & Torx, (32) 1-inch driver bit assortment: slotted, Phillips, Robertson & Torx, (2) hex-to-square socket adapter: 1/4-inch - 1/4-inch, 3/8-inch, (1) max-mag nut drivers: 1/4-inch, 5/16-inch, 3/8-inch

Christmas Sales Makita T-01389 62-Piece Impact Drill-Driver Bit Set Specifications

The Makita T-01389 62-piece drill and driver set is a great value -- more accessories, more savings. Every tool is black-oxide coated to resist corrosion, and given a proprietary heat treatment for sharper, longer lasting life. Manufactured with Ultra-Lok 1/4-inch hex shanks, the tools are compatible with all quick-change connector systems, electric or battery-powered drill/drivers, and impact drivers. The drill bits are manufactured using high-speed steel with precision 135-degree split-point tips to prevent drill bit walking. The pro-grade, maximum magnetic 3-inch bit holder and nut drivers provide extra-strong fastener retention.

Key Action Shot
View larger
Feature 1Feature 2
Feature 3Feature 4
T-01389 Features
PERFORMANCE - Pro-Grade Impact Drill-Driver Compatible

DURABILITY - Black Oxide finish resists corrosion and extends drill bit life

VARIETY - 62 pieces of the most commonly used bits provides outstanding versatility for your drilling and driving jobs

CONVENIENCE - Durable, compact storage case

INCLUDES - Injection molded case with 62 pieces

Tool Specifications
Tool Spec
Overall length7-3/4"
Net weight2.1 lbs.
About Makita's Power Tool Accessories
Get the right accessory for your toughest applications. Makita has a full line of accessories including framing blades with advanced "M-Tooth" design, ultra-coated miter saw blades, steel demolition bits, Optimum diamond blades, Thruster Percussion bits, Blue Steel CERMET-tipped blades, and many, many more. Expand your LXT cordless lineup with 18-volt lithium-ion batteries, Energy Star-rated battery chargers, flashlights, and jobsite radios.

Makita LogoAbout Makita
Makita is a worldwide manufacturer of industrial quality power tools and offers a wide range of industrial accessories. Makita applies leading-edge innovation to engineer power tools that are more compact and energy efficient, yet deliver industrial strength power and results. Makita U.S.A., Inc. is located in La Mirada, California, and operates an extensive distribution network located throughout the U.S.Makita is Best in Class Engineering.

Whats in the Box
Makita T-01389 62-Piece Impact Drill-Driver Bit Set includes:
Injection molded case
(33) 1-inch Driver bit assortment:
      Phillips bits:
  • 4 Phillips #1   
  • 9 Phillips #2   
  • 4 Phillips #3   
  • Robertson/Square drive bits:   
  • 2 Robertson #1   
  • 3 Robertson #2   
  • 3 Robertson #3   
  • Torx bits:
  • 2 Torx T15      
  • 3 Torx T20      
  • Slotted bits:
  • 1 Slotted 6-8   
  • 2 Slotted 8-10   
  • (9) 2-inch Driver bit assortment:
          Phillips bits:
  • 2 Phillips #2   
  • 2 Phillips #3   
  • Robertson/Square drive bits:   
  • 1 Robertson #2   
  • 2 Robertson #3   
  • Torx bits:
  • 1 Torx T20   
  • 1 Torx T25   
  •  
    (7) UltraLok black oxide drill bits precision/135° split point 1/4-inch hex shank:
          2 1/16-inch, 3/32-inch, 2 1/8-inch, 3/16-inch, 1/4-inch
    (4) Wood boring spade drill bits with spurs:
          3/8-inch, 1/2-inch, 5/8-inch, 3/4-inch
    (3) 3.5-inch Extended length driver bits:
          Phillips bits: 2 Phillips #2
          Robertson/Square drive bits: 1 Robertson #2
    (3) Magnetic nut drivers:
          1/4-inch, 5/16-inch, 3/8-inch
    (2) Hex-to-Square socket adapter:
          1/4-inch, 3/8-inch
    (1) Magnetic bit holder


    SAVE NOW on Christmas Sales Offers below!

    Available In Stock.

    This Christmas Makita T-01389 62-Piece Impact Drill-Driver Bit Set is cheap and shipping as well.

    Price : Click to Check Update Prices Please.

    Makita T-01389 62-Piece Impact Drill-Driver Bit Set

    Limited Offer Today!! Makita T-01389 62-Piece Impact Drill-Driver Bit Set Christmas and Cyber Monday 2011 Deals

    Healthy Supplements Lcd 42 Inch Hdtv

    How To Build A Patio Cover

    If willing to experiment and build a Patio Cover, hammer out questions as to why you need a Patio Cover, for what purpose, whether it would be painted or made with wood, prefabricated aluminum or PVC, and if permission is required from state or city authorities. Remember that a patio is an extension of the house, generally not more than 12 feet and single-storied. The patio can be fully covered or have no cover. No special skills are required for building a Patio Cover except co-coordinating your patience, dimension of area, number of wood or aluminum panels and material required.

    Drill Bit Kit

    Begin with the necessary spade work according to weather conditions, area and usage of patio. The next step is selecting material from a comprehensive range, including polycarb panels for high summer or winter temperatures, vinyl opaque all weather conditions, vinyl translucent and clear panels suitable for use in milder weather conditions, aluminum pan roof that is cool, durable and requiring little maintenance, or insulated foam panels providing insulation for a strong low-maintenance roof. The panels should fit and install easily, and offer design flexibility. Check if the gutter system is accessible for cleaning whether it is w-pan gutter, roll form gutter or extruded gutter and valance.

    Drill Bit Kit

    For that professional Patio Cover you would need appropriate tools; you can order a complete tool kit or purchase one. The tools required would be a 3/8"" drill bit, hack saw or electric jig saw with fine-toothed blade for metal, a caulking gun, measuring tape, screwdriver, hammer, metal snips, socket and shank, crescent wrench, level, carpenter's square, ladders, heavy duty pencils, masonry and nuts and bolts. If the patio is attached to the house then the existing support system will help cover to fit easily. For a free-standing patio the cover will have to be fitted on all four sides, depending on shape. The building instructions will guide you step by step.

    How To Build A Patio Cover
    Drill Bit Kit

    Christmas Sales Black & Decker 71-91291 129-Piece Complete Home Essentials Kit 201

    Dec 21, 2011 23:49:25

    Christmas Black & Decker 71-91291 129-Piece Complete Home Essentials Kit Deals
    Click for larger image and other views

    Black & Decker 71-91291 129-Piece Complete Home Essentials Kit

    >> Click here to update Christmas prices for Black & Decker 71-91291 129-Piece Complete Home Essentials Kit <<

    Christmas Sales Black & Decker 71-91291 129-Piece Complete Home Essentials Kit Feature

    • All you need for most indoor/outdoor home projects
    • Tackle any drilling project: wood, metal, plastic and masonry
    • Variety of screw driving bits: Phillips, slotted, square, star and hex
    • Compact storage when closed and open easy access for project use
    • Kit includes assorted drill bits, spade bits and screwdriving bits, hex keys, nutdrivers, drill bit guage, magnetic bit tip holder


    Christmas Sales Black & Decker 71-91291 129-Piece Complete Home Essentials Kit Overview

    Hang pictures and other home decorAssemble furnitureMount exterior house number or ornaments on stone or brickInstall curtains / blindsIndoor / Outdoor drilling in wood, masonry, metal and plasticFasten Or Hang Window BoxesDrill large holes or run wiringInstall new cabinet hardwareCatalog Number Description Qty General Purpose Drill Bits (wood, metal and plastic) 19 Brad Point Drill Bits (wood only) 13 Masonry Drill Bits (rotary - use in non-hammer mode) 4 Spade Bits 4 Hex Keys 12 Nutdrivers 9 Drill Bit Gauge 1 Magnetic Bit Tip Holder 1 1" Screwdriving Bits: Phillips, Slotted, Hex, Square and Star 48 2" Screwdriving Bits: Phillips, Slotted and Star 18


    SAVE NOW on Christmas Sales Offers below!

    Available In Stock.

    This Christmas Black & Decker 71-91291 129-Piece Complete Home Essentials Kit is cheap and shipping as well.

    Price : Click to Check Update Prices Please.

    Black & Decker 71-91291 129-Piece Complete Home Essentials Kit

    Limited Offer Today!! Black & Decker 71-91291 129-Piece Complete Home Essentials Kit Christmas and Cyber Monday 2011 Deals

    Mini Microwave Milk Whey Usb Media Player

    How to Install Iron Or Metal Balusters in Wood Handrails

    As promised I am putting forward information on the installation of iron balusters. During the day, one of the most common questions I get from customers is the how to of iron baluster installation.

    Drill Bit Kit

    Many building codes require three balusters on a tread to comply with the 4" sphere rule. Check with your local code officials if you have any doubts about your stair's compliance.

    Drill Bit Kit

    First, I let the customer know that the very last thing in balustrade installation is the iron balusters. It simply works well to install the newel posts, handrail, treads and risers first. Once installed layout the balusters on the floor and use a level to plumb up to the handrail center and mark the connection at the center bottom of the handrail. Using a ½" paddle or spade bit one can drill upward 1" deep into the handrail. Using a 5/8" paddle bit drill a hole no more than ¼" deep into the floor. Once these are drilled out the bottom of the handrail can be sanded with an orbital sander and the complete balustrade system can be stained and finished. Once the stain and finish is completed one can begin installing the iron balusters.

    One of the following two tools is recommended for cutting iron or metal balusters: a power miter box with a metal cutting blade, or a portable band saw. My preference is the portable band saw. It works cleaner, is more portable, and doesn't cause sparking as does the power miter box (or chop saw).

    Turn the baluster upside down and set the round dowel top into the hole in the floor, holding the baluster plumb to the hole under the handrail. Mark the baluster with a pencil, measure up 3/8" minimum and that would be the cut mark. Note that you are cutting off the bottom, not the top, of the baluster. This ensures proper alignment of the design elements.

    For gluing the installer has two options: Epoxy or construction adhesive. My personal preference is construction adhesive as I have more control over the product and, if it gets messy, wipes away easily and can also serve as a caulk around the iron. Epoxy comes in the mixing tubes and doesn't always mix properly. If it gets messy and dried, removing the epoxy also removes the powder coating on the iron. Some carpenters prefer and have their own control over epoxy. I do not. I find construction adhesives easier to work with.

    Squeeze a small amount of the adhesive into the hole under the handrail. The adhesive is thick and slow and will not drain back out, giving time to complete the installation. Make sure the shoe for the iron baluster is slid up while installing. Push baluster's round dowel up into the ½" hole under the handrail and then drop it into the 5/8" hole in the floor in a bed of additional construction adhesive. Square off the baluster's alignment then drop the shoe down to the floor. If the shoe comes with a set screw, use an Allen wrench to tighten it. The glue in the handrail hole will settle around the baluster creating a perfect seal. Once the glue has dried the baluster will be well secured, even helping to strengthen the handrails load.

    When installing 5/8" iron balusters the process is identical, one only needs to drill a 5/8" hole under the handrail and a ¾" hole at the floor. 5/8" iron is ideal in remodeling work, when replacing wood balusters. Most installed wood balusters have a 5/8" hole under the handrail and a ¾" hole at the floor. If replacing wood balusters with ½" iron it is usually recommended to install shoes under the handrail to cover a small square peg in a larger round hole. The use of wood or cabinet screws helps to lock the baluster in, serving as both a wedge and forcing the baluster on center.

    Round 5/8" iron or metal balusters can be installed without shoes simply by drilling a 5/8" hole into the handrail and into the floor and following the same procedure outlined above.

    I have been asked about making the holes square. It is possible with a little more work. To cut the square hole in the floor or handrail, drill a round hole in the wood the same size at the baluster's overall width. Then chisel out the hole to make it square. Another option is a "mortising bit." I have not used one of these but have spoken with carpenters who have. Their comment tends to be that this method is a "pain in the you know what."

    How to Install Iron Or Metal Balusters in Wood Handrails
    Drill Bit Kit

    Christmas Sales DEWALT DCD760KL 18-Volt 1/2-Inch Cordless Compact Lithium-Ion Drill/Driver Kit 201

    Dec 20, 2011 23:13:56

    Christmas DEWALT DCD760KL  18-Volt 1/2-Inch  Cordless Compact Lithium-Ion Drill/Driver Kit Deals
    Click for larger image and other views

    DEWALT DCD760KL  18-Volt 1/2-Inch  Cordless Compact Lithium-Ion Drill/Driver Kit

    >> Click here to update Christmas prices for DEWALT DCD760KL 18-Volt 1/2-Inch Cordless Compact Lithium-Ion Drill/Driver Kit <<

    Christmas Sales DEWALT DCD760KL 18-Volt 1/2-Inch Cordless Compact Lithium-Ion Drill/Driver Kit Feature

    • Lightweight design (4.0 lbs) minimizes user fatigue
    • Dual speed range 0-500/0-1700 rpm delivers optimal performance
    • LED worklight provides increased visibility in confined spaces
    • Compact track saw batteries (DC9181) are compatible with the existing system of DEWALT 18v power tools produced since 1996
    • Compact size (8.2-inch) allows users to fit into tight spaces;


    Christmas Sales DEWALT DCD760KL 18-Volt 1/2-Inch Cordless Compact Lithium-Ion Drill/Driver Kit Overview

    Powered by Lithium-Ion batteries for long-lasting, reliable performance without the weight of nicad packs the DEWALT DCD760KL 1/2-Inch 18-Volt Cordless Compact Lithium-Ion Drill/Driver is a powerful tool. Its compact and lightweight design provides easy, comfortable handling on the job site or in the shop. Ideal for a range of professional jobs, this efficient tool includes two Lithium-Ion batteries, 30-minute yellow lithium/nicad charger, and heavy-duty kit box.

    callout box top
    1/2-Inch 18-Volt Cordless Compact Lithium-Ion Drill/Driver Kit
    At a Glance:
    • Offers dual speed range (0-500/0-1,700 rpm)

    • 1/2-inch chuck; 17 clutch settings

    • Powered by rechargeable, long-lasting compact Lithium-Ion batteries

    • Measures 8.2 inches and weighs 4 pounds

    • Backed by a limited three-year warranty; 90-day money-back guarantee
    callout box bottom
    DEWALT DCD760KL 1/2-Inch 18-Volt Cordless Compact Lithium-Ion Drill/Driver KitThe compact, lightweight design of this drill/driver makes drilling overhead or in tight spaces a cinch. View larger.

    DEWALT DCD760KL 1/2-Inch 18-Volt Cordless Compact Lithium-Ion Drill/Driver KitEnjoy quick, reliable drilling thanks to the drill/drivers 17 clutch settings. View larger.
    Dual Speed Range for Versatility and Control
    Efficient and powerful, the DEWALT DCD760KL 1/2-Inch 18-Volt Cordless Compact Lithium-Ion Drill/Driver is a must-have for any job site or professional shop. It offers 17 clutch settings, an LED work light for improved visibility in tight spaces or low-light conditions, and features a user-friendly design that keeps things simple so you can get the job done right the first time. It also offers the convenience of a dual speed range of 0-500/0-1,700 rpm for optimal versatility.

    Lightweight, Compact Design for Tight Spaces
    Weighing in at just 4 pounds with a length of 8.2 inches, the DCD760KL lets you work all day without putting excessive strain on wrists and hands, which helps boost productivity. Its compact size also makes it easy for you to drill in tight spaces like under sinks, and in corners, or a closet.

    Lithium-Ion Batteries for Long-Lasting, Quick-Charging Performance
    The DCD760KL is powered by compact Lithium-Ion batteries that are compatible with the existing system of DEWALT 18-volt power tools produced since 1996. These batteries are far lighter weight than nicad batteries, charge in just 30 minutes, and are long lasting, so you can minimize downtime.

    Warranty Information
    The DEWALT DCD760KL 1/2-Inch 18-Volt Cordless Compact Lithium-Ion Drill/Driver is backed by a limited three-year warranty, 90-day money-back guarantee, one-year free service contract, and two-year free service contract on the batteries.

    What's in the BoxDrill/driver, two compact Lithium-Ion batteries, 30-minute yellow top Lithium/nicad charger, and heavy-duty kit box.

    DEWALT DCD760KL 1/2-Inch 18-Volt Cordless Compact Lithium-Ion Drill/Driver KitFasten and finish hard wood projects with this 18-volt drill/driver.


    SAVE NOW on Christmas Sales Offers below!

    Available In Stock.

    This Christmas DEWALT DCD760KL 18-Volt 1/2-Inch Cordless Compact Lithium-Ion Drill/Driver Kit ships for FREE with Super Saver Shipping.

    Price : Click to Check Update Prices Please.

    DEWALT DCD760KL  18-Volt 1/2-Inch  Cordless Compact Lithium-Ion Drill/Driver Kit

    Limited Offer Today!! DEWALT DCD760KL 18-Volt 1/2-Inch Cordless Compact Lithium-Ion Drill/Driver Kit Christmas and Cyber Monday 2011 Deals

    Hot Air Soldering Station

    Building Your Own Still - The Perfect Science Fair Project

    If you are one who is searching for that perfect undertaking that will surely win the year's award for the best science fair project then don't look any further beyond constructing the simple still. For those who do not have any idea as to what a still is, it is an apparatus that is meant to distill, or separate, liquid mixtures by boiling since different liquids have different boiling points.

    Drill Bit Kit

    Before starting with the construction, it is important to note that building a still may lead one to run-ins with the law which makes it important for one to be knowledgeable of the regulations in one's area and to devote the project entirely for scientific and educational purposes.

    Drill Bit Kit

    To start the construction process of the still: the following materials are needed: a 4-gallon size copper boiler, a copper sheeting that is 18" in diameter, a copper pipe that is 36" long and 2" in diameter, a 24-inch copper tubing that is 1" in diameter, lead-free solder, glass thermometer, milk can made out of stainless steel, two reducing coupler that have the following dimensions: 1" x 1-1/2" and the other 1-1/2" x 2", an elbow joint that has a 1" diameter, a 3" nipple, 1" x 2-1/2" nipple, a large copper tub, 1-1/2" copper elbow pipe, copper coils, standard spigot faucet, any container that can be easily sealed, a siphon, an airlock, a rubber stopper, flour and water (a silicon kit can be used as an alternative), a connecting ring, yeast, a large amount of cold water, and the mixture to be fermented.

    For the tools, one would need a holder gun, a drill, a saw, and a heat source.

    To assemble the boiler, one would have to saw the copper boiler in half and lay on its open end the copper sheeting. Cut a piece from the sheeting that is 1 centimeter larger in diameter than the copper boiler's open end. Solder then the sheeting to the open end of the copper boiler. After this, place the boiler flat side down and drill a 2" hole on the boiler's top. Solder a connecting ring directly on top of this hole.

    To construct the still's column, bore a hole on the top of the elbow connector that will be big enough for it to be soldered to the 3"-sized nipple. Soldering is also done to the 2" pipe to fasten it to the ring on top of the boiler. The elbow connector is in turn soldered to top of the pipe with the help of the 1 x 1-1/2" reducing coupler. Solder then the nipple in place after which the thermometer is inserted there and secured into place with the use of the silicon kit or flour and water. The elbow pipe is then soldered to the other coupler. The 1" elbow joint is then fastened with the end of the pipe in a way that makes the elbow point downward. This end is then soldered with the smaller nipple. The nipple is then soldered to the coiled copper tubing and the spigot is soldered into the drilled hole present on the side of the metal container. The heat source is then placed below the boiler.

    Put the yeast and the fermented mixture in the container, which will be drilled with a hole just enough for a rubber stopper to make it sealed air-tight.

    You are now ready to use the still. Constructing it may be a bit laborious but with the proper materials and a thorough adherence to the right steps of building it, the still is just the thing for that science fair competition.

    Building Your Own Still - The Perfect Science Fair Project
    Drill Bit Kit

    Christmas Sales DEWALT DCD760KL 18-Volt 1/2-Inch Cordless Compact Lithium-Ion Drill/Driver Kit 201

    Dec 20, 2011 00:09:51

    Christmas DEWALT DCD760KL  18-Volt 1/2-Inch  Cordless Compact Lithium-Ion Drill/Driver Kit Deals
    Click for larger image and other views

    DEWALT DCD760KL  18-Volt 1/2-Inch  Cordless Compact Lithium-Ion Drill/Driver Kit

    >> Click here to update Christmas prices for DEWALT DCD760KL 18-Volt 1/2-Inch Cordless Compact Lithium-Ion Drill/Driver Kit <<

    Christmas Sales DEWALT DCD760KL 18-Volt 1/2-Inch Cordless Compact Lithium-Ion Drill/Driver Kit Feature

    • Lightweight design (4.0 lbs) minimizes user fatigue
    • Dual speed range 0-500/0-1700 rpm delivers optimal performance
    • LED worklight provides increased visibility in confined spaces
    • Compact track saw batteries (DC9181) are compatible with the existing system of DEWALT 18v power tools produced since 1996
    • Compact size (8.2-inch) allows users to fit into tight spaces;


    Christmas Sales DEWALT DCD760KL 18-Volt 1/2-Inch Cordless Compact Lithium-Ion Drill/Driver Kit Overview

    Powered by Lithium-Ion batteries for long-lasting, reliable performance without the weight of nicad packs the DEWALT DCD760KL 1/2-Inch 18-Volt Cordless Compact Lithium-Ion Drill/Driver is a powerful tool. Its compact and lightweight design provides easy, comfortable handling on the job site or in the shop. Ideal for a range of professional jobs, this efficient tool includes two Lithium-Ion batteries, 30-minute yellow lithium/nicad charger, and heavy-duty kit box.

    callout box top
    1/2-Inch 18-Volt Cordless Compact Lithium-Ion Drill/Driver Kit
    At a Glance:
    • Offers dual speed range (0-500/0-1,700 rpm)

    • 1/2-inch chuck; 17 clutch settings

    • Powered by rechargeable, long-lasting compact Lithium-Ion batteries

    • Measures 8.2 inches and weighs 4 pounds

    • Backed by a limited three-year warranty; 90-day money-back guarantee
    callout box bottom
    DEWALT DCD760KL 1/2-Inch 18-Volt Cordless Compact Lithium-Ion Drill/Driver KitThe compact, lightweight design of this drill/driver makes drilling overhead or in tight spaces a cinch. View larger.

    DEWALT DCD760KL 1/2-Inch 18-Volt Cordless Compact Lithium-Ion Drill/Driver KitEnjoy quick, reliable drilling thanks to the drill/drivers 17 clutch settings. View larger.
    Dual Speed Range for Versatility and Control
    Efficient and powerful, the DEWALT DCD760KL 1/2-Inch 18-Volt Cordless Compact Lithium-Ion Drill/Driver is a must-have for any job site or professional shop. It offers 17 clutch settings, an LED work light for improved visibility in tight spaces or low-light conditions, and features a user-friendly design that keeps things simple so you can get the job done right the first time. It also offers the convenience of a dual speed range of 0-500/0-1,700 rpm for optimal versatility.

    Lightweight, Compact Design for Tight Spaces
    Weighing in at just 4 pounds with a length of 8.2 inches, the DCD760KL lets you work all day without putting excessive strain on wrists and hands, which helps boost productivity. Its compact size also makes it easy for you to drill in tight spaces like under sinks, and in corners, or a closet.

    Lithium-Ion Batteries for Long-Lasting, Quick-Charging Performance
    The DCD760KL is powered by compact Lithium-Ion batteries that are compatible with the existing system of DEWALT 18-volt power tools produced since 1996. These batteries are far lighter weight than nicad batteries, charge in just 30 minutes, and are long lasting, so you can minimize downtime.

    Warranty Information
    The DEWALT DCD760KL 1/2-Inch 18-Volt Cordless Compact Lithium-Ion Drill/Driver is backed by a limited three-year warranty, 90-day money-back guarantee, one-year free service contract, and two-year free service contract on the batteries.

    What's in the BoxDrill/driver, two compact Lithium-Ion batteries, 30-minute yellow top Lithium/nicad charger, and heavy-duty kit box.

    DEWALT DCD760KL 1/2-Inch 18-Volt Cordless Compact Lithium-Ion Drill/Driver KitFasten and finish hard wood projects with this 18-volt drill/driver.


    SAVE NOW on Christmas Sales Offers below!

    Available In Stock.

    This Christmas DEWALT DCD760KL 18-Volt 1/2-Inch Cordless Compact Lithium-Ion Drill/Driver Kit ships for FREE with Super Saver Shipping.

    Price : Click to Check Update Prices Please.

    DEWALT DCD760KL  18-Volt 1/2-Inch  Cordless Compact Lithium-Ion Drill/Driver Kit

    Limited Offer Today!! DEWALT DCD760KL 18-Volt 1/2-Inch Cordless Compact Lithium-Ion Drill/Driver Kit Christmas and Cyber Monday 2011 Deals

    G-Lite Stroller Dualit Toaster

    Starting a Mobile Locksmith Business

    One of the best decisions I ever made in my 62 years of life on this planet was to become my own boss in a field that is never dull, always challenging, and intrinsically interesting. It was not an early decision. In fact it did not occur to me to enter this field until after I'd already spent ten years as a professional photographer. It came about in an odd way, as many serendipitous things do. But regardless of how it came to be, I consider that decision the one that paved the way for me to spend the rest of my working life in comfort and with a good measure of security.

    Drill Bit Kit

    I've since discovered that many people follow a similar course, turning to locksmithing only after finding themselves unhappy in other jobs. I'm not sure how or why so many discover this particular business when looking for an interesting career. In my case it was a natural progression from a rather unique part-time career I had fashioned for myself: That of installing simple door viewers and doing this door to door. Many times my customers would ask if I could install deadbolts for them while I was at it, and after turning down money a dozen or so times I finally got wise and visited a local locksmith supplier who sold me an install kit and a book of instructions. From what I can tell, others come across this idea by doing Internet searches for home businesses, because ultimately this qualifies as such if you, like I do, run it out of your home and structure it as a Sole Proprietorship. In any case, it is obvious that locksmithing has become a popular choice for a chance at self-employment.

    Drill Bit Kit

    After tiring of door to door selling (which didn't take long to do) I hit upon the idea of cold calling. I was still thinking too small, but at the time I didn't know it. Lesson Number One: Don't do this. I was doing it back in 1981 or so when the stigma attached to such endeavors wasn't quite so strong. I'm afraid that calling people out of the phone book and asking if they'd like to have deadbolts installed just would not fly in the present era of terrorism and business rip-offs.

    Still, I owe to this period of hard knocks a good deal. I became efficient at installing locks, rekeying locks, and duplicating keys. It was during this one year period that I scrounged together enough money to purchase a small key duplicator and also a lock rekeying kit. I carried these items in the trunk of my car and carried them into my customer's home when needed. I also purchased several boxes of the most common domestic key blanks and by the time I'd accumulated all this stuff my car's trunk was crammed and I was wishing for more room. Also, and most important, I came to realize that driving around in an unmarked car and working out of the trunk was not lending itself well to my credibility.

    Lesson Number Two: Start out with credibility. Purchase a small work van, or a large one if you can afford it. Buy signs or have signs painted on it. Use whatever lending power you have, may it be with banks or with family, to locate a used vehicle and have signage made up, even if this is in the form of magnetic signs. Of course all this suggests you start out as a legitimate business, and this is just my point. Create a name for your business (think long and hard about this, as you'll lose any credibility you might initially gain if you keep changing it), have signs and forms and letterheads made up, and dive in.

    There is, too, the question of legality. This is a hard subject to field, because the legality of doing business from one jurisdiction to another can differ widely, and even wildly. It is incumbent upon you to do the research and determine whether or not your jurisdiction requires a locksmith be certified, bonded, and/or licensed. You'll almost certainly discover that licensing is the fundamental hurdle, and that is usually taken care of with the signing of a few forms and the payment of a small annual fee. Certification is something else. Not all jurisdictions require this. In my case I found that the state in which I was then living -- Utah -- did not require it. Nor was I required to be bonded, though I chose to do so for the added protection (it is widely and incorrectly thought that bonding protects the locksmith's customer, whereas in fact it is the locksmith that is protected by the bond).

    Lesson Number Three: Do the homework required to determine if acquiring a business license is all that is needed to establish your locksmith service. One phone call to your state's Attorney General office will likely answer that question.

    Once you have lined up an affordable vehicle and put a reasonably professional sign on it, you must begin outfitting it. This should, and must, be done before you begin advertising your services because if you are like I was at this point you know next to nothing about the business and not much more about the work. We will endeavor at this point to educate ourselves. Locksmithing is in point of fact one of the few professions left in this world in which a formal education is absolutely UNnecessary. I have spoken to very few professionals during my career who got to be that way through going to a 'locksmith school' or a college. This is certainly not to say that a formal education isn't desirable. If you can afford it, if you have the means, then by all means take that route. This article is for those of you who can't.

    The vehicle you purchase will in large part determine how it is to be equipped. I've always preferred a full-size van (I've owned Ford, Chevy and GMC models during my career), but there are many locksmiths who just love the Astro Van or Safari Van made by GM. These minivans are popular with many different professions and are ubiquitous. You can undoubtedly find one in your price range. Either way, the first order of business is to erect a work bench that will give you as much space as possible. Best to have the bench on one side of the van and leave the opposite side for shelves or storage bins. Make it sturdy! There is nothing worse than a wobbly bench when you're trying to rekey locks. Make it level for the same reason.

    You'll need a power source. It is excusable to string extension cords until you can afford something better, but bear in mind that this detracts from your professionalism. The ultimate is probably having a RediLine Generator that runs off your van's 12V power. This is not a power inverter, it is actually a generator and it kicks out 110-115V power. They are wonderful sources of AC power and you can even run a bank of flourescent lamps off one of these for your interior shop lighting. There are several models to choose from with varying outputs, but they are expensive. If you can locate a rebuilt, so much the better. A good inverter might do the trick if you can't afford a RediLine, but be careful. Some key machines (and you're going to have to have one) will not run with an inverter.

    Power now available, you need to start out with at least a key duplicator on your bench and preferably, as well, a good code cutting machine. The latter is desirable but not necessary in the beginning unless you plan to launch directly into automotive locksmithing, in which case you'll find it hard to get along without one. We'll touch on that in a moment. Key machines are almost impossible to find used. You'll likely end up buying a small HPC Speedex because they're pretty much the least expensive good key duplicator around. Expect to pay around 0. Best if you include this in your initial loan. A key duplicator is bread and butter for any locksmith, mobile or otherwise, so don't even think about starting up until you have one.

    Equip yourself with a good rekeying kit. I've always preferred 'universal' kits because they do the work of dozens of other keyway-specific kits and they are easy to use. LAB makes the best of these, hands down. If you have the space, try to get a metal Classic Kit. If you don't, you can start out with one of LAB's Mini-Durex kits or, better, the miniature version of the Universal Kit (LMK-005 or LMK-003). You simply can't rekey locks without one, and if you get a Universal you won't be confined to keying up one or two brands . . . you'll be able to handle them all. Don't know how to rekey locks? Pick up an instruction manual on the Internet or at Amazon.com. They are available and this is one of the quickest locksmith skills to pick up. While you're at it, buy at least one plug follower, a pair of pin tweezers, and ideally a pair of TruArc pliers. Over time you'll accumulate more rekeying tools but these fundamentals are nearly essential.

    Even before I was making money rekeying locks, I was being called to open cars. If you intend to advertise yourself as an emergency service, you're going to have to take in this kind of lucrative work. Let me tell you now, this will be the easiest money you've ever made. It is well worth learning the skills required to open vehicles even if it means spending a couple of hundred dollars on tools and a good manual. Lockouts, at least in my case, virtually supported me for years. If you live in a medium to large city, count on getting lockout calls day and night even if you have only a tiny ad somewhere (a subject for later). There are many good lockout kits available online, to suit any budget, and the same goes for lockout manuals. Do a Google search for 'car opening tools' or 'lockout tools' and you'll have no trouble finding suppliers. Are they legal where you live? Again . . . this is up to you to determine. The supplier cannot and will not endeavor to police this aspect of marketing, as it is simply not possible. I'm not advocating the purchase of anything that is not legal where you reside!

    House and business lockouts are likewise lucrative sources of income for the locksmith, but these require different skills, different tools. Here is where it becomes necessary to learn the skill of lock picking -- probably the most fundamental skill of the trade. It is not as easy to learn as car opening and lock rekeying, but it is by no means difficult, either. It requires practice and patience, and it requires good tools. Do not get stingy here. There are lots of cheap lock picking tools for sale. You'll find them in automotive magazines, even. Stick with tools from the established firms like HPC, SouthOrd, Lockmasters, etc. Purchase a beginner's set with a few picks and one or two tension tools for start, unless you have a big budget, then go for a set that will last you a while. Choice of spring steel or stainless steel is largely a matter of personal choice. Whichever one you start out with will likely be the kind you'll stay with, because you'll form an attachment to that type and you'll train yourself to make the best of it. More important is the concept of practice. Buy Practice Locks. Once you've picked all the locks in your home you're going to need more challenges, and now that Practice Locks are an accepted training aid in this field you'd do well to pick up a few of them. Practice until you can repeatedly pick the most challenging of your Practice Locks and then practice some more.

    Did I mention that servicing lockouts will likely be the single most lucrative service you offer your customers? I thought so. Good!

    There are other aspects to providing a locksmith service and among these is the ability to install locksets on homes and businesses. Primarily you'll be asked to install deadbolts, but later on, as your business gets bigger, you'll want to offer commercial business and real estate companies the option of replacing all their old lock hardware for newer more secure hardware. Again, practice is called for and you should be prepared to install a few unnecessary deadbolts and knobsets on doors in your own home that don't need them. After doing this a dozen or so times, it will be easy to go to that first installation with confidence. You'll need to add a few essential tools to your toolbox, such as a 1/2 inch drill, a couple of hole saws (2-1/8 inch and 1-inch), a 1/2 inch boring bit, and a good wood chisel. With these tools, you can install deadbolts in metal or wood doors. Complete installation kits are available and are the best choice if you can work them into your budget. Need instruction? Books galore available on Amazon.com or at any large scale bookstore in your city.

    Once you've accumulated vehicle and the tools, and some knowledge gleaned from practice and reading, you can start thinking about getting your feet wet. The best way to start is the old fashioned way and that is to appeal to family and friends for work and for referrals. Network. Talk to everyone you know and let them know you're serious about this and that you are available. Step two is to advertise and this is absolutely necessary, even if you start out only as a listing in the Yellow Pages. This is where 99% of the people who need a locksmith will look. Newspaper ads, flyers (Yucchhh!), direct mail and radio ads don't work for locksmiths unless you have one enormous budget. Try to justify a small one-eight or one-quarter page Yellow Page ad if at all possible. Even in the face of huge competition, you will get calls and over time your name will be spread around, if you do a good job. Well, it will get spread around if you don't, as well, but you'd do well to avoid that.

    That's how I did it. That's how thousands of others have done it, give or take a detail or two. Be sure to cover the legal bases, because if you jump into it and find later that you're acting outside the law, don't come to me! This is part of your research. It is not that difficult to acquire a certification and satisfy local laws that may pertain to this business. If you keep the business small, and maintain yourself as a sole owner, you're going to be profiting right off the bat because overhead with a mobile service is nil.

    It's within your reach whether you're 18 or 58.

    Starting a Mobile Locksmith Business
    Drill Bit Kit

    Christmas Sales TEKTON 2928 14-Piece Power Nut Driver Bit Set 201

    Dec 18, 2011 21:36:28

    Christmas TEKTON 2928 14-Piece Power Nut Driver Bit Set Deals
    Click for larger image and other views

    TEKTON 2928 14-Piece Power Nut Driver Bit Set

    >> Click here to update Christmas prices for TEKTON 2928 14-Piece Power Nut Driver Bit Set <<

    Christmas Sales TEKTON 2928 14-Piece Power Nut Driver Bit Set Feature

    • Forged and hardened chrome vanadium steel
    • Corrosion-resistant sandblasted finish
    • Universal 1/4-inch hex shanks
    • Complete with work belt storage clip
    • Quality guarantee


    Christmas Sales TEKTON 2928 14-Piece Power Nut Driver Bit Set Overview

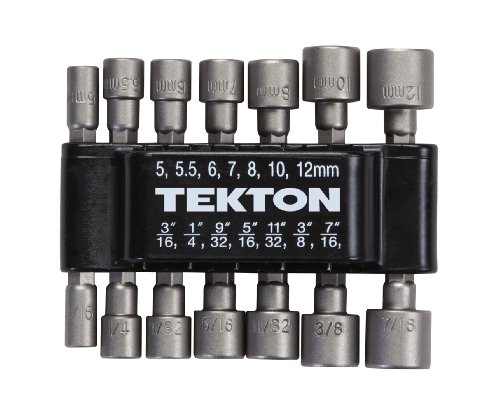
    This 14-piece power nut driver bit set features sandblasted, chrome vanadium steel, precision-milled, 1/4"-hex shanks made to fit all power drills, screwguns, and cordless and magnetic screwdrivers. It contains seven power nut driver bits (SAE): 3/16-inch, 1/4-inch, 9/32-inch, 5/16-inch, 11/32-inch, 3/8-inch, and 7/16-inch, and seven other power nut driver bits (metric): 5 mm, 5.5 mm, 6 mm, 7 mm, 8 mm, 10 mm, and 12 mm. It also comes with a plastic storage clip designed to fit on workbelts.


    SAVE NOW on Christmas Sales Offers below!

    Available In Stock.

    This Christmas TEKTON 2928 14-Piece Power Nut Driver Bit Set ships for FREE with Super Saver Shipping.

    Price : Click to Check Update Prices Please.

    TEKTON 2928 14-Piece Power Nut Driver Bit Set

    Limited Offer Today!! TEKTON 2928 14-Piece Power Nut Driver Bit Set Christmas and Cyber Monday 2011 Deals

    Powder Whey